- Setup a QT tank, and fill it with rock from the older systems that needs to be cycled. - 10% done.
- Drill a 25 high to be a dedicated Chaeto farm. - I bought a drill bit!
- ATO system - See below
- Lights - See below
- The ongoing salinity issue - slowly getting there, added salt to the ATO reservoir
- The surge bucket plumbing leak - See below
- Scrape the glass - Ugh, slow
- Clean out the Calcium reactor and prep for use - I've given it a stern look.
- Grow actual Chaeto - Success! Magic impending.
- Tyree cryptic bucket - 80% done, need actual rock. (see #1)
First, the ATO. Primarily due to my own inability to order the proper parts, my fancy Apex ATK has been offline since day 1. I actually got all the parts a week or so ago, but my low salinity issues have caused me to fill the makeup water with saltwater, rather than R/O.
It occurred to me last night, that instead, I can just start dumping salt in the ATO reservoir, and let it do all the work for me. So I dug through my bucket of ancient powerheads, found one that worked, plugged it in, dropped it in the reservoir, and dumped some salt in. Problem eventually solved!
This leads up to last week's leak. Yes, the brand new surge bucket was all running nicely, and then a fitting split, and stupid got all over the floor. Initially, I wanted to get another one of those really nice manifolds from FlexPVC, but apparently they don't sell them anymore! Sad acros! Instead, I purchased a ton of different fittings, and made this abomination:

This gives me my 4 1/2" outputs, and my single R/O output. The idea of the manifold, is that it runs off the COR-15 in the sump, and feeds the two reactors (both running carbon right now), the surge bucket, and eventually it will feed both the extra fuge, and the cryptic bucket. After a day or so of letting the glue dry, I plumbed it back in, and fired it up.
Sadly, only for a few minutes, as immediately it sucked the sump dry, and the main return started spitting out bubbles. Luckily, this looks like a job for an ATO! The ATO was running, but the problem is, when I fire up the COR-15, the levels all change immediately, which does activate the ATO, but it can't keep up with a COR-15. So instead, I had to move the ATO limit switch up in the sump, to raise the water level, and then slowly bring it back down once the bucket was running again.
The fun part of this, is the Neptune ATK is really smart, and designed to keep a water level stable, and not flood your house. This is a good thing. It also meant I needed to defeat that, and instead, got paged all day by Fusion because the PMUP keeps running past the 5 minute mark and goes into shutdown. I have no intention of defeating this, so I just suffered all day and reset it alot.
Finally, I got enough water into the system that it was stable with the COR-15 running at 80%, (alot of water loads up into that manifold and reactors, it's non-trivial). And finally, the bucket was fired up again! Joy!
Some of you have expressed interest in my solar tubes. It's a cloudy day today, so around 11am, I took this photo. This shows a few things:
- I still fail at the scraping.
- I still need more rocks
- I have some algae that needs ganking, and some apistaisa.
- Light levels on a cloudy day.

Speaking of lights, some of my parts arrived Friday. I ordered 4 massive passive heatsinks from ledcdi. The sinks are made by Mechatronix, and are called CoolBay Tera's. They are monsters. I kinda went overkill, and could have gone down to the Giga models, but, meh, I am uninterested in saving $20 and risking having to do this again.
So the state of my lights is this. I have the sinks. I have the lenses. I have 2 brand new COB chips sitting around somewhere. 2 other brand new ones are en-route from China, and should have been here by now. I also have 1 COB that looks like it's not burnt out, so I should play with it and find out.
First, lets discuss the old lights... Here, you can see 3 of the heatsinks and light setups that were pulled down off the tank. Like I said ages ago, they worked great, but when the fans died, poof.

So how much heat does an LED on thermal runaway produce? Well, enough to melt the solder clear off the heatsink and disconnect the sink from the heat tubes! You can also see the joys of salt here, and how it got into the fins and caused ruin of the airflow.
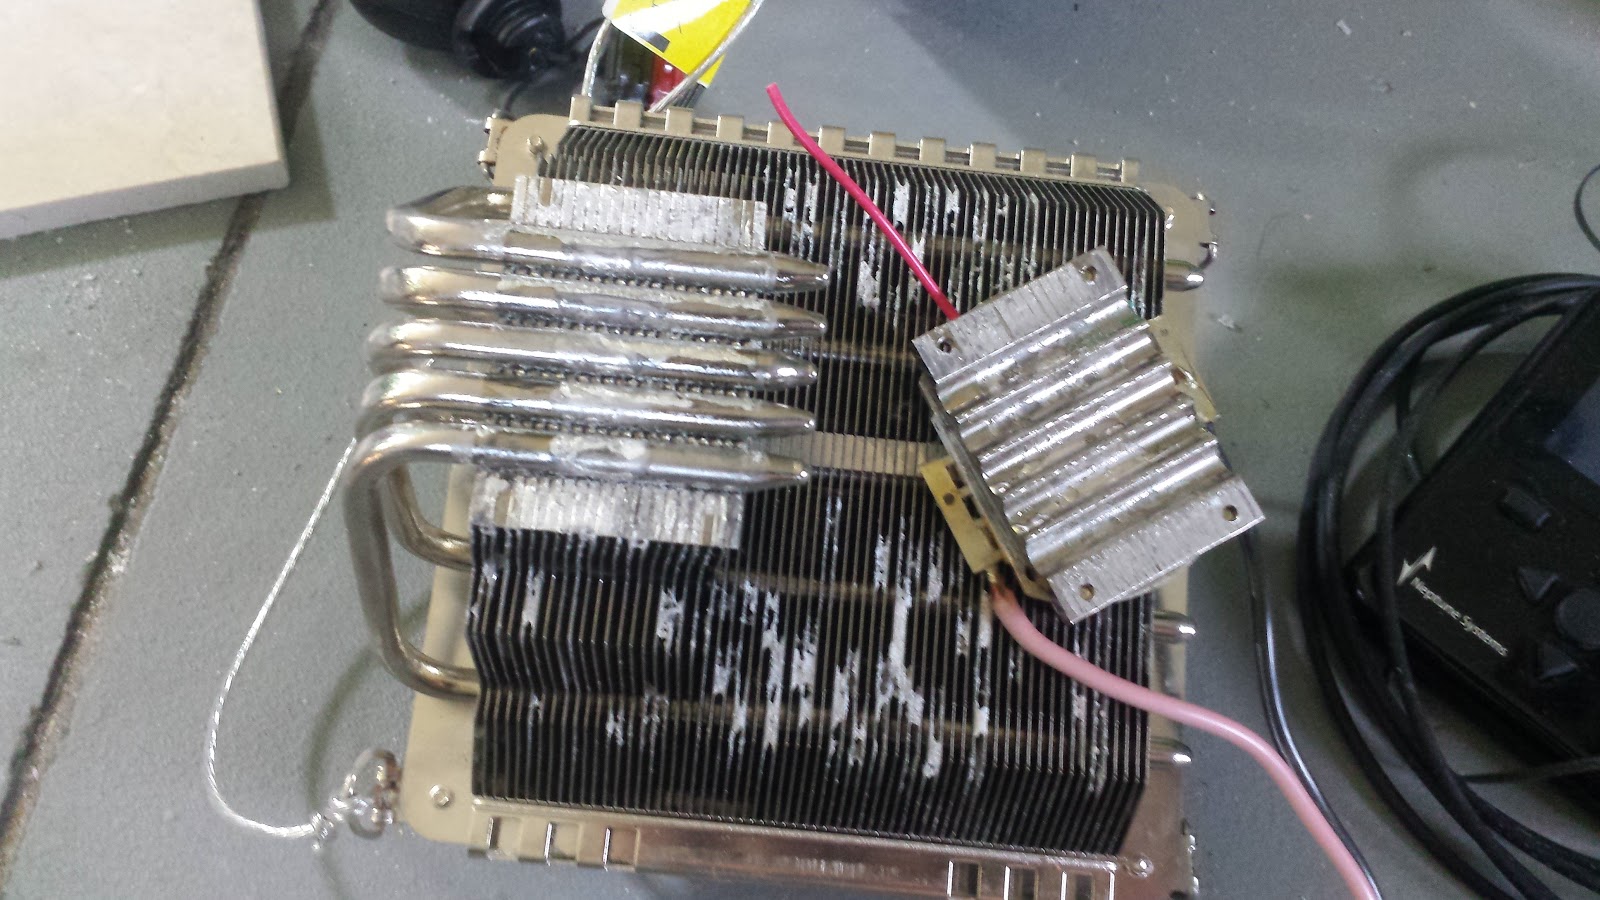
Finally, a side by side of two LED's. The one on the left is clearly blown. The one on the right is hopeful. (The little red wire was me using the blown one to practice soldering to the inside of the chip, rather than the outer connectors.)

So lying about the house, somewhere I knew I had a spare MeanWell HLG-150H-B sitting around, which is really close to what I run on the actual tank. It's been so long since I fiddled with this, I had to go look at the manual again. One of the great things about this driver, is that it's dimmable, in so many ways. You can use a resistor, 0-10v PWM, or 0-10v (Apex VDM). This is super handy, as I can just throw a resistor on it, and then use it to test LED's without having to use my welding mask.
So I got the old, suspect LED, and wired it up to the driver.

No go. It exhibits really odd behavior. When you plug it in, nothing happens. When you unplug it, you get a brief lightup of the diodes. I suspect it's melted some traces somewhere. Sad acros.
So instead, lets get one of the new ones out of the old box, wire that up, and see what we can make happen!

Let there be light!

Boom. That looks *amazing*. The old ones I have, are 60% blue, 40% 15K daylight. They make for amazing lights. And here you get your first glimpse at the absurdity of my heatsink. Yes. That's a 12lb heatsink. All aluminum, coated in some kind of magical stuff that sinks heat away quicker, nice hole through the middle for the wires to run, and a massive internal heat pipe that wicks heat away from the center to dissipate it down the length of the sink. Well worth $100 a pop.
Now that I know I can make this work, I needed to start dealing with the lenses. The lenses are solid glass, and pretty heavy. The old solution of "lets glue it to the LED and pray" didn't work. They all fell off. New solution, 3D printer + PETG:


You can see in the final picture, the little holes on the sink (113mm centers) that will be used to attach the lens. All I need are some 30-40mm M3 screws, and I can secure the lenses nicely. I printed these in opaque white PETG, with an absurd number of top and side layers, as well as 50% infill. They are stupid strong. The little V at the top should provide a little more light focus, to prevent room spillover a bit more. We will see. For those of you wanting to try this at home, but without a 3d printer, it would be just as easy to do with a 120mm diameter Aluminum plate and a drill.
The parts came out almost perfect, but the hole for the lens was about 1mm too small, and the holes for the screws were a bit tight too, so I edited the model, and am currently re-printing it. Once I have it all fixed up, I'll post it on thingiverse.
So next steps there are pretty much wait for a few more parts to arrive to do the actual hanging of the lights, wait for the rest of the LED's to show up, and then wire the whole lot and hang em high!
Hopeful for LED's in the mail, I wander off to bed..
No comments:
Post a Comment