Monday, July 4, 2016

More fiddling with water

After a few more weeks of testing, I've found some new values, and edited the script more.

  1.  Originally, I had thursdays blacked out because the Yard guys come that day.  It was simply blacked out via cron. I noticed in the hard summer, this was too harsh, and the lawn would dry out too much that day.  Instead, I've written blackout hours into the script, so just the 8 hour window is blacked out.
  2. I've added day/night sensing via the LUX sensor.  I also have a day trigger number (21) and a night trigger number (19). This gives a slight preference to watering at night, while still keeping the lawn safe from dryout during the daylight hours.
  3. I had to bump the time each valve runs to 900 and 600 seconds for the primary/secondary rows.
All these changes, and the lawn is starting to green up quite a bit.  I think I've almost nailed it.

Some future ideas:

  1. Fix the ground temp probe, and if the ground is frozen, don't water.
  2. Maybe don't water if it's super windy?  This is semi-debateable, because the high wind dries the lawn out fast.
Got to keep fiddling.  Maybe I'll go automate something different for awhile.  It's working well so far.

Thursday, May 19, 2016

Finally have some lawn data

Having run the system for about a month, and fixing a few problems here and there along the way, I finally have a few days worth of data from the lawn, and some results.

My current setup is thus:

  1. Water trigger point set at 25. When one of the sensors hits 25, we fire off the appropriate set of sprinklers.
  2. The sprinklers run for about 10-12 minutes each to give a good deep soak.  One sensor triggers a pair of sprinkler rows on either side of the sensor.
  3. The script runs once every 3 hours to check the sensors. It takes about 30-45 minutes after watering for the water to drain into the soil, and soak the sensor.  Running the script out of cron every 3 hours seems to be about right.
First, the pretty graph:
Lawn data.  Set point 25, 3 hour cycle, 18 days.

In the graph above, we can see the 4 sensors, and in blue, we see the sprinklers.  The tall blue spikes are the lawn sprinklers, the little short ones all over the place are just the drips, so ignore those.

 And of course, the second result, being the lawn itself.  I've noticed a very slight browning from this watering schedule.

I've also noticed in the above graph, that it seems to take two watering sequences to drive the sensor down.  If you look closely, you can see before each dive in the sensor, there are two blue spikes 3 hours apart.  I believe the lawn is getting too dry in-between waterings, and it's taking alot of water to backfill. This is especially true for row 3, which seems to dry out the most.  Perhaps in a future edit, I will run that row's sprinklers longer.  Looking even closer, it looks like row 3 never triggers.  Apparently row 4 triggers and I think row 3 is just getting overspray.  Row 4 seems to have the steepest incline of the 4 slopes post-watering.

Due to all of the above, what I've done now is set the trigger point down to 21.  I'm hoping this provides better results.  I'll have to run it for another week or two to find out.  In some ways, this is a very interesting method of programming, as it takes 2-3 weeks to find out if your code changes work or not.

Writing code to interact with nature turns out to be much more challenging than having it interact with a computer.  Fun stuff!

Wednesday, April 6, 2016

Minor update on moisture sensors

Turns out I was utterly soaking my lawn.   Guess these might have been a good investment.  I installed them, and watched them for a few days, got nothing but 0's.  (0 being "utterly soaked").  I decided to turn the sprinklers off for a bit, and make sure the sensors were working, however, I accidentally left one of the schedules on, a 5 minute run per zone daily.  Here is what happened:


The last watering they would have gotten was around 5am.  You can see the steady march upward as the lawn dried out starting around 14:30.  The blue line is the sprinklers going off. (ignore the smaller blips, those are the drips, the one we care about is the big spike at 5am).  At 5am the sprinklers fire off for 5 minutes each.  You can see how two of the sensors respond to this immediately (1 and 4), but the other two are a bit more slow.  1 and 4 are the outside pair, and 2,3 are the innermost two sensors, closer to the center of the lawn.

The sensors responded within about 25 minutes on those outer pairs, especially #4.  I will be watching this over the next few weeks, and start writing some code to auto-adjust the sprinklers depending on conditions.

According to the Davis sensor manual, "turf does not need to be watered until 25-40cb".  I suspect that there needs to be some kind of hysterisys in there, so maybe let it rise to 60 and then knock it back down to 25?  Mostly, I need to watch the graphs for a bit, so I can determine exactly how much each valve contributes to the moisture, and how much time per valve is required to move the moisture a specific amount.  Once I have this data, I think I can start programming code to make everything automatic.

The benefit of course, should be that the water will automagically self-adjust to deal with the changing of the seasons.  That's the theory at least.

Also, side note, given the way sensor 4 responded so radically, it makes me suspect an underground leak.  Hrmm.

Thursday, March 31, 2016

Trenchin' ain't easy

Today I finally got around to installing my moisture sensors in the lawn.  I'm using the one-wire moisture reader from http://www.hobby-boards.com/store/ (who, btw, are sadly going out of business and fire-selling all the inventory, so if you want one, buy it now.

It uses the probes from a Davis moisture meter.  I think they were about $75 each, so a bit pricey!   Sadly, I purchased the setup about 2 years ago, but have kept putting it off, because, well, digging a trench sucks.

However, the trench is done, and the probes are installed.  Luckily, literally 5 minutes before the lawn guys showed up to mow.

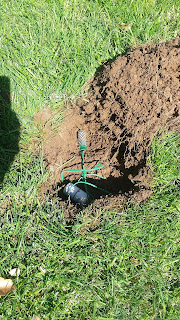
A long time ago, I buried a length of direct burial wire right up to the edge of the lawn.  After playing forgetful pirate for a few hours, I located the buried bundle, and pulled it all out.  I needed a way to connect the sensors to this Cat6 that wouldn't end up with water inside the sensor.  I think I came up with a good way, we will find out over time.

The wires, all hooked up.

For each one, I stripped the middle of the wire, hooked the sensor up to the chosen pair, and then jammed it through a hole I drilled in a 3/4" PVC end cap.  I then filled the little chunk of PVC with silicone, let it dry, and then installed the other cap.  Hopefully this will keep the sensor connections dry.  I also did use shrink wrap on them, so it should be fine.


I was also apparently smart enough to bury an extra wire, so I used this to hook up a DS18B20 temperature sensor too.  I did essentially the same thing for that one, except this time,I put a huge glob of silicone all inside the hole, and pushed the sensor through that hole, so it would be close to the outside, without actually touching any water.


Finally, each sensor was buried in the ground in it's final resting place.  I was able to find the manual online for the sensors, and it suggested a 45' angle, 3-5" deep for turf.  So that's what I did.  Rather than digging a full trench, I just used a shovel to make a slit in the ground, and then found some random tool and shoved the wire down into the slit.  Basically, it just needs to be deep enough so a mower doesn't eat it.  They said to install the sensors soaking wet, so right now, I'm not getting any useful data from them.  Well, the ground temp sensor is reading 61F, and it's about 70F out right now, so that's something I guess.

As part of the prep for installing the sensors, you are supposed to soak them for 30 minutes, and let them dry for 12 hours, over and over.  While doing this, I noticed they dry out very slowly.  They were not quite fully dry by morning, maybe half way.  So they probably respond rather slowly.

Also, in what was a bit of a surprise to me, they read in cb, or centibars, which is a unit of pressure.  Basically they tell you how much pressure (like suction on a straw) is required to remove moisture from the surrounding soil, into the sensor.  I guess this simulates roots drawing water in, and how difficult or easy it is.  Bone dry, a sensor reads 199cb.  Soaking wet, 0cb.

Once I have some accumulated data, I'll post pretty graph pics.

Tuesday, March 29, 2016

New version of gnhast - 0.4

Gnhast 0.4 has been released today, and while it has a bunch of fun new features, it also has one really big one.  A web/tablet interface!


Lets look at the changelog, and then back to the pretty pictures:

0.4 - Release Version
        Added Collectors:
                moncoll
                jsoncgicoll

        Added Tools:
                gnhastweb
                gtk-insteonedit (partially complete)

        Added Commands:
                cfeed
                setalarm
                dumpalarms
                listenalarms
                ping
                imalive
       
        New Features:

        Support for new style insteon HUBs.

        Collectors now have self-health checks, and gnhastd monitors them.  A collector will be flagged as bad if it doesn't send updates, or fails to respond to "pings".  This can help with certain devices that get  wedged up after awhile, or collectors that die off mysteriously.

        moncoll collector is a special collector that interfaces with the collector devices created on the gnhast server, and when a collector is marked bad, it can restart the collector, forcibly if needed.

        cfeed is a new type of feed to monitor switches.  Unlike the usual timed feed, cfeed will notify the listeners immediately upon change.

        Add an alarm subsystem.  This is very basic.  Each alarm has a user-generated uid, a blob of text, and an arbitrary severity number. This can be used by scripts to post generic alarms to other things. Currently nothing uses this, eventually the web interface will be made aware of it.

        gtk-insteonedit is a tool to allow link editing of insteon devices directly.  It is still partially complete.

        gnhastweb is a full fledged web GUI for gnhast.  It allows basic editing of devices, and placing devices into groups.  However, what it is actually designed for, is to give you a tablet/phone based control panel for your house.  Each device is a small "card" on the UI,       and you can interact with them.  They are dynamically updated with the current status, and you can do things like flip switches on and off, adjust dimmers, etc.  It can also interface with your rrd files generated by rrdcoll to display simple graphs of sensor data.  The interface is completely configurable via conf file.  You can even substitute hand-generated html for some, or all of the groups, to do something like use an image map of your house as the navigation.  More documentation on this will need to be provided.


So what kinds of things does gnhast support now?  All kinds of fun stuff.  ad2usb Ademco/Honeywell alarm interfaces, IrrigationCaddy sprinkler controllers, Venstar thermostats, and of course everything it previously supported.  Insteon, one-wire, Brultech, etc.  And now you have a nice interface for a tablet to control it all, that you could mount on your wall.  Hint.  Hint.

Download it here