But first, Pic of the day from the automated camera!

(yeah, kinda lame still, and that window reflection is annoying)
There are three main projects I've been working on since the last major post. The first is the water itself.
Now some people might not know this about me, but I'm one of those no-water-change nutters. I don't believe in water changes unless its absolutely critical. When I started this reboot however, I did have concerns. It sat semi-fallow for so long, and well, there was that electrical fire, and I did pull a shattered heater out, so, it's entirely possible the water was full of death. So I've been running various tests, and trying to fix things, while also being aware that I might just have to suck it up and do an 800g water change...
The first issue is nitrates and phosphates. A while back, I got a Red Sea kit, and did some tests. The Phosphates were something like .34, so, that's bad. The nitrates were off the scale, so probably in the 80's. My solution for this was chaeto. I dumped a bunch of Chaeto into the tank, and it's taken off. I've now harvested about 3 gallons of it (terrible measure, but, umm, you get it). So this is working pretty well, but the nitrates just weren't moving.
So I decided what the heck, there is nothing big in the tank yet, lets try vinegar. I had tried vodka years ago, but I really didn't have any dosing charts, so I just wung it, and added way too much, and whited out the tank. But now there are nice little charts, so, I decided to follow one. So I started dosing about 46ml of vinegar a day to the tank, and slowly ramped up to 52ml. I also decided to turn the skimmer up just a little bit, to help out.
So day 1, of course the skimmer overflows. That was fun. But easy to fix, and I let the experiment run for a few weeks, and did another pair of tests on the N and P. Phosphates didn't move at all.. still 0.34. But nitrates were now down to 8ppm (from 80!). Wow. That was really fast. I don't actually believe that number. Re-tested. (yes, I actually re-tested a good result!). Nope.. Still 8. huh. ok. Well there are a few possibilities here..
1) The vinegar worked!
2) The chaeto worked!
3) My testing procedure is suspect.
You see, I was using the high range on the nitrate/phosphate test. So to do so, you add 15ml of RO water to 1ml of sample, and test that. On all my previous tests, I was kinda lazy, and took RO water from the kitchen RO, but on these, I took RO/DI from the tank feed. It's possible that I have high nitrates in the kitchen RO water. I need to actually test that to find out, but it's not a priority just yet.. so.. for now, I'll take the good nitrate reading, and just leave the vinegar dose as-is.
This of course, leaves the main issue, which is, what if the general composition of the water is death? Luckily, we now have these *amazing* Trition ICP tests, where I can find out if that is the case or not. So obviously I sent one of those in, and just got the results back a few days ago. I was kinda terrified to look at them, expecting to find like 7000ppt of lead or something. Nope. Almost everything is perfect. Wow. Basically the test had the following to say:
1) Salinity is low. Check. yeah. knew that.
2) Calcium is low. Yep. Hanna said 288, ICP said 302. Check.
3) Phosphates are high. Yep. Check.
4) Lithium is a little high. Umm. Ok.. Whatever.
5) Zero Iodine in the tank. Ok, fixable.
6) Everything else is pretty much perfect. Like, all the baddies are zeros perfect. Wow.
So the solution at this point is pretty simple. Step 1, dump one of the carbon filters out, and replaced it with GFO. I'll just strip all the P out of the tank, and let it go wild, so if the sandbed is buffering any, it will strip that too. I'll fix the phosphates later by feeding the tank. So right now I've got about 2lbs of GFO running on the tank. Should be fine. :)
Step 2, fix the Calcium. So, oddly, my Alkalinity is kinda perfect, so I suspect the coralline algae has just been sucking calcium at a higher rate. Long term the plan is kalk and CaRx, but I don't have any real uptake right now, so those aren't viable solutions yet. Easy answer, I'll just dump a bunch of CaCl2 in the tank and spot fix it, then maintain with kalk later.
Step 3, stay the course in fixing the salinity. I have been unwilling to just hard spike it back up with salt, so I've been slowly raising it by using saltwater for the ATO. It's gone from about 24 to 31 in the last 2 months, so I'm almost at the goal post now.
So I feel like the water itself is in hand now, and I can start worrying about other problems. One of those problems is dosing. I am already sick to death of doing 52ml of vinegar a day, and it was a miracle I kept it up while sick. So I had to do something to fix this. I took a multi-pronged approach.
First, I dug around on Amazon, and found that Kamoer makes a 24v peristaltic pump. Hey, guess what 24v means? It means I can run it directly off the Apex 24v ports! So 20 dollars later, I have myself a little pump, and a box of Molex micro v3 connectors (the very ones used on the Apex cords).

So step one was to cram some batteries together, and test this little pump. I had some 12v batteries lying about, so I managed to cobble together a cheap 24v supply, hooked it to the pump, and it immediately went to work. A few tests later, and I figured out it does 83ml a minute. and pretty reliably at that. So this is not really ideal for vinegar, because it means I would have to run it for 37 seconds a day. Thats too obnoxious to program into the Apex. But I still feel like this is a useful device, so I'll keep going.
So I find a bit of wire that's long enough, and crimp on the molex pins. Now right here, is where I tell you, don't do this. Just buy the Apex cable. I have a ton of various crimpers and tools for this kind of work, but nowhere among them is a crimper that is designed for pins this tiny. These pins are microscopic. It was a nightmare to crimp them onto actual wires. So either buy the $20 cable, or buy an 80-100$ molex crimp tool. Either way, about an hour or so later, I had a molex connector attached to my little pump. Next step was a way to mount it.

I very quickly hacked up a mount in tinkercad and printed it. I'm not actually very happy with it, but it does the job. It's basically a hole, with some more holes so you can bolt it on. It's very grotty, but holds the pump in place.

I gave it a quick test on the Apex, and yes, it works. Works perfectly, and delivers 83ml a minute, just as advertised. This is less useful than I was hoping though. I think I'm going to set it aside, and use it down the road to run the kalk reactor.
Ok, so now we still have a dosing problem. Lets check the interwebs. Looks like I can 3D print a doser for a Nema 17 stepper motor pretty easily. Problem is, then I have to control a Nema 17. In order to do that, I'm going to need an Arduino, and a few other parts. Quick calculation from Amazon says, I can get all the parts to build a multi-head dosing pump, for about $30 a head, so, $120 for a 4-head doser run via arduinos. 2 days to print, probably another day to solder it up, and a day or two to write the code to run the whole thing. Ok, 4 days of work and $120. Sounds like a plan.
Nope. Screw that. Turns out a little Jebao 4 head dosing pump is available on Amazon prime for $60. For the price it would have cost me to make my own, I can just have two of these (one as a backup!). And less labor. So guess what I did?

In other realms of ridiculous, I also thought, well, lets go to the container store, and get some little plastic containers to use as dosing containers. They don't need to be magical aquarium containers, I can attach R/O tubing to anything. Price for 3 decent looking containers from the container store? About $60-80. Then add on the fittings, and the labor. Let's check Amazon. Yep. 3 x 1.5L dosing reservoir, $55. Amazon beats DIY again.
So plug the new doser in. Fill the reservoir with vinegar, run it a few times to calibrate. Done. Kinda... I put the output line for the doser in the sump, right after the skimmer, before the return pump. So 4 times a day, I put 13ml of vinegar into the water. And 4 times a day, my Apex pages me the pH is too low, because the probes are right next to that dose input. Argh. Going to have to figure out a fix for that eventually..
So this leaves project number 3.. The sponge bucket!
I've been slowly working on this one for awhile now, and this weekend I finally finished it up.
First, the idea: I'm a big fan of Steve Tyree's books, and I even have signed copies of them. Total nerd. Anyhow, one of my beliefs has always been that sponges are what makes tanks long term stable. Over time, sponges grow in all the little crevices in your rocks, and they all filter the water, and this is why I can get away with not doing water changes for 8 years. One of Steve's books, talks about setting up an "Environmental Gradient" in a tank. Now I love the theory of this, but if you look at his diagrams and pictures, the whole thing just looks absurd. He has shelves and racks of corals sitting over piles of rock in the dark, and curtains, and this is no way to run a giant display tank. But I still like the idea...
So my modification to this, is a remote bucket, filled with small live rock rubble, and very slow bottom to top flow of water. The bucket will be completely dark, so no algae to compete with the little sponges, and they can proliferate to their valve's content in there, and make my water all sparkly.
So step 1. Get a bucket and a 3/4" uniseal. Measure the height of the sump, and the highest place on the bucket I can place the uniseal. Build a little wooden box to raise the bucket enough to have the drain at the right height. Easy.

Step 2. Drill a hole for a uniseal. Drilling holes in plastic is a bit of a pain really. So rather than doing the hole-saw nightmare, I decided, lets try a unibit for a uniseal! Turns out unibits are these magical devices that are PERFECT for drilling holes in plastic. It made this perfect, beautiful hole. No marring, no catching, dead perfect edges, drilled through like butter. I will always use one of these from now on.

Ok, that part was easy. Now the plan is to pump water through a fitting in the lid of the bucket, down to the bottom. So all I need to do is run a tube from the lid down to the bottom. Except, the bucket will be full of rocks, and sponges, and other fun stuff. If I ever want to take the lid off, I won't be able to get the tube back in.
Solution, build a little pipe that creates a channel for the tube! I got a 4-way PVC fitting, and drilled a hole the diameter of 1/2" PVC right through the top of it. I then assembled the fitting with some short pieces of pipe, and little elbows to stand it up off the bottom of the bucket. Now I have a little sleeve for my tubing to fit into, making it super easy to remvoe the lid.
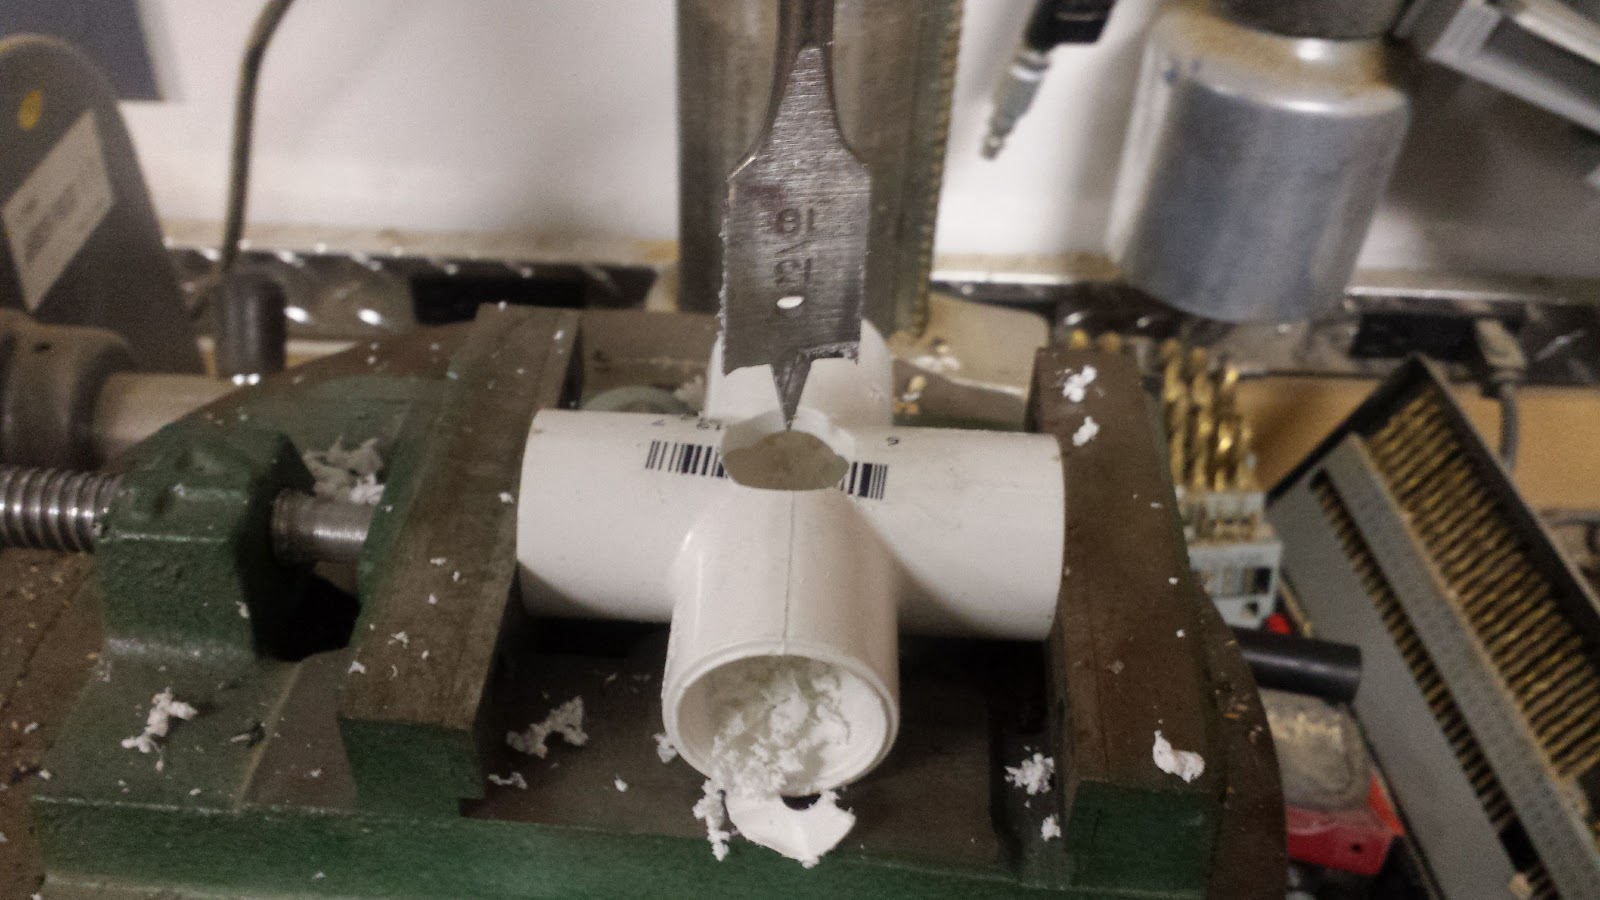

Quick test, and oops, the whole thing floats. Because the pipe is sealed, and the air can't get out from the little elbows. Easy fix, drill a hole in the 4-way to let the air out.

Now I need to make a little shelf for the rock to sit on. I get a piece of eggcrate, and slice it up, put a hole in the middle, and perfect. A nice little rock shelf. Test fit the whole thing, and everything is wonderful.

Next the lid. Drill a hole (with a unibit!) in the middle of the lid, and put on a 1/2" bulkhead. Top of the lid gets an R/O fitting, bottom gets a random fitting I had that happens to be the same diameter as some tubing I have lying about. Insert a length of tubing, and we have a lid.


Now all that was left, was to run some 3/4" pipe out the uniseal, and back into the sump, and then hook up water from the manifold into the top, and give it a test run. For the test run, I put some tape on the side of the bucket, and ran a stopwatch as the bucket filled. I marked the tape as it filled at 1 minute intervals. Lets see how it did:

3.5 cm per minute. I feel like this is pretty close to perfect. Not slow enough to be anaerobic, not fast enough to blast the sponges.
 I filled the bucket with some rocks I had been cycling in my QT tank for a month or so, and a few small rubble rocks from the display tank that had some sponges growing on them. I figure in a few months these will spread, and eventually I'll have a bucket full of sponges and filter feeders. Hooked everything up, checked for leaks, and poof. Done!
I checked on the bucket this morning, and noticed that the light over the fuge was shining onto it, and it was getting a little too much light. I'll probably end up wrapping it in some thick cloth, just to keep the light out. Seems like a simple enough solution.
I solved alot of water related problems today, so I'm pretty happy. Now that I know the water in the tank is safe, and the nitrates are down, it means I can start stocking and turning the lights on. That means the next step is to re-aquascape the tank, and finish filling it with rock. I'm going to just use dead rock for the rest of the tank, which I have been slowly collecting. The last shipment should arrive monday. Now I utterly suck at aquascaping. Not my thing. But the wife seems interested in it, and she is more artistic than me, so the plan is for her to draw up some ideas today, and some time next week, we will give it a go. Once that is done, I can start turning the main lights on, and get the ugly phase going, and throw some CUC in there!

I'm so close to having real life in there I can almost touch it. Excited about moving rocks around, I shimmy off to bed...